Practical Redux, Part 5: Loading and Displaying Data
This is a post in the Practical Redux series.
Intro 🔗︎
Last time, we built up a hardcoded initial UI layout for Project Mini-Mek using Semantic-UI-React, added a tab bar component controlled by Redux, and started using a "feature-first"-style folder structure for our code. This time, we'll improve debugging support with sourcemaps, define data models with Redux-ORM, use those models to load data into the store and display it, and add the ability to track which items are selected.
The code for this project is on Github at github.com/markerikson/project-minimek. The original WIP commits I made for this post can be seen in PR #3: Practical Redux Part 5 WIP, and the final "clean" commits can be seen in in PR #4: Practical Redux Part 5 Final.
I'll be linking to each "final" commit as I go through the post, as well as specific files in those commits. I won't paste every changed file in here, to save space, but rather try to show the most relevant changes for each commit as appropriate.
Table of Contents 🔗︎
- Adding Sourcemap Support for Better Debugging
- Making File Structure Consistent
- Extracting Components in Features
- Adding a Mock API for Sample Data
- Connecting the Unit Info Tab
- Adding a Redux-ORM Schema and Model
- Loading Pilot Data with Redux-ORM
- Displaying a List of Pilots
- Defining Models with Relations
- Displaying a List of Mechs
- Handling Selection Logic
- Final Thoughts
- Further Information
Adding Sourcemap Support for Better Debugging 🔗︎
Before we can start working on the code for this set of improvements, we need to make some library updates that will help improve our development experience, by fixing up a weakness with the debugging process.
Tools like Webpack and Babel compile our input source code, transform it in various ways, and output a bundle containing all the transformed code in one file. This is great for production use, since users will load a site faster thanks to smaller files and fewer requests. However, trying to debug code that's been compiled, minified, and bundled is just about impossible. Fortunately, this can be solved with sourcemaps, which contain information the debugger can use to show the original code instead of the transformed code.
Webpack has many different options for creating sourcemaps, with varying tradeoffs for speed, details, and contents. Up through Create-React-App 0.7.0, CRA configured Webpack to use the eval sourcemaps option. That option shows you individual files in the debugger, but shows the code after it's been compiled by Babel. Looking at that in the debugger is better than trying to read minified/bundled code, but it's not exactly the prettiest, as seen in this screenshot:
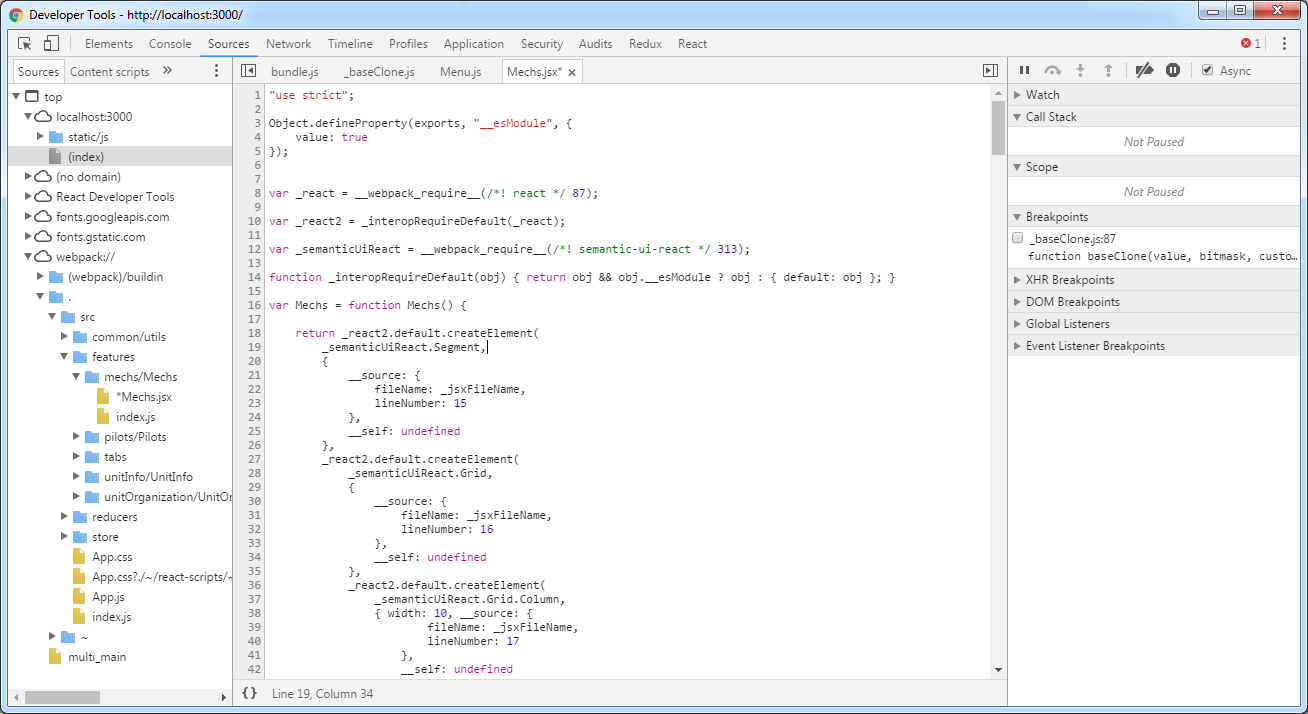
The devtool: "eval" option was chosen because sourcemap support in both browsers and tools hasn't always worked right, and this option was known to at least produce usable results.
After a lot of discussion, in Create-React-App 0.8.0, the sourcemaps option was switched to one that should actually show the original code. I was extremely excited about this, but soon ran into a problem - while I could see the code as expected, I couldn't set any breakpoints. Fortunately, after some further investigation by the CRA and Webpack teams, fixes were made, and Create-React-App 0.8.2 was released with working sourcemap+breakpoints support. This made me very happy :). A couple other bug fix releases were put out while I was working on this post, so at the time of writing the latest version is Create-React-App 0.8.4.
Technically, create-react-app is just the CLI tool that's used to create a new project. The real magic happens in the react-scripts package, which includes all the build tool configuration. So, after running yarn add --dev react-scripts@0.8.4 and restarting the development server, the same debugger view should now look like this:
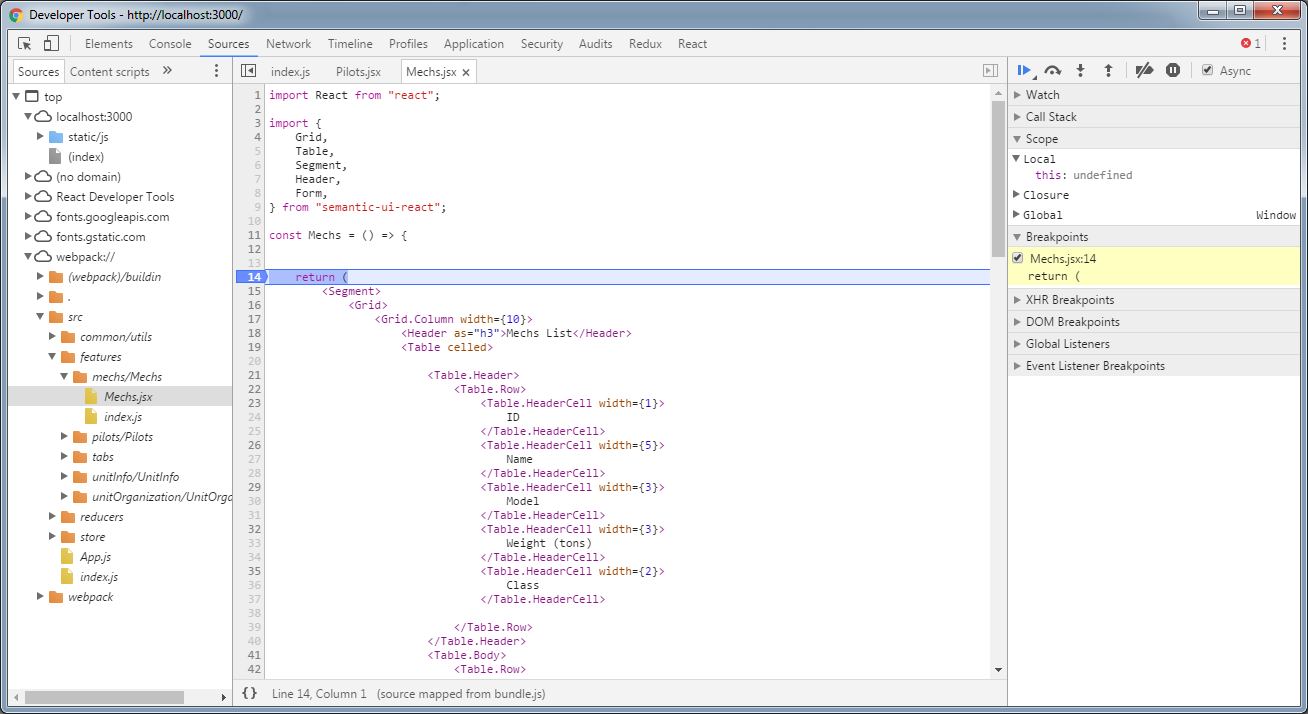
Notice that we now see the original source code (even the JSX), the DevTools debugger will let us set breakpoints on most of the lines in the file, and we've even added a breakpoint and stopped there during a re-render. This will make the development experience much easier as we go along! Definitely time to save that change.
With that upgrade in place, we can now turn our attention back to the code. We'll start by completing the file reorganization we worked on last time.
Making File Structure Consistent 🔗︎
As described in Part 4, we're using a "feature-first" folder structure. However, not all the code qualifies as a "feature". There's really three main divisions: common code that's generic and reused throughout the application, code that's specific to a feature, and the application-level code that ties those features together.
We'll do some more file shuffling to reflect those concepts:
Commit 611cb6f: Move core project files to /app for consistency
After the move, the project file structure now looks like this:
- src
  - app
    - layout
      - App.js, App.css
    - reducers
      - rootReducer.js
    - store
      - configureStore.js
  - common
    - components
    - utils
  - features
    - mechs
    - pilots
    - tabs
    - unitInfo
    - unitOrganization
  - index.js
Extracting Components in Features 🔗︎
The original UI layout we made in Part 4 has a single component for each of the tab panels. It also has fake data hardcoded right into the UI layout itself. That's not going to work well when we start dealing with actual data. So, before we can work with data, we should extract some components from those panels.
Looking at our <Pilots> component, it really consists of two main parts: the list of pilots, and the form showing the details of a single pilot. It makes sense to extract separate components for each of those, so we'll split out a <PilotsList> component and a <PilotDetails> component.
In addition, the pilots list has a couple different parts. The header section is static and won't change. We could leave that as part of, the render method in <PilotsList>, but we might as well split it out as a PilotsListHeader> while we're at it. At the same time, we definitely need to be able to render an individual row for each pilot entry, so we'll create a <PilotsListRow> component that we can use while rendering the list.
Since we're transitioning from hardcoded text in the UI, we should start making use of some kind of sample data. For the moment, the simplest approach is to treat <Pilots> as a "container" component, store an array with one item in its state, and pass that down to the list and details components.
Commit c404584: Extract components from Pilots panel, and add initial test data
The main part of our <Pilots> component now looks like this (skipping library imports):
features/pilots/Pilots/Pilots.jsx
import PilotsList from "../PilotsList";
import PilotDetails from "../PilotDetails";

const pilots = [
    {
        name : "Natasha Kerensky",
        rank : "Captain",
        age : 52,
        gunnery : 2,
        piloting : 3,
        mechType : "WHM-6R",
    }
];

export class Pilots extends Component {
    state = {
        pilots : pilots,
    }

    render() {
        const {pilots} = this.state;

        // Use the first pilot as the "current" one for display, if available.
        const currentPilot = pilots[0] || {};

        return (
            <Segment>
                <Grid>
                    <Grid.Column width={10}>
                        <Header as="h3">Pilot List</Header>
                        <PilotsList pilots={pilots} />
                    </Grid.Column>
                    <Grid.Column width={6}>
                        <Header as="h3">Pilot Details</Header>
                        <Segment >
                            <PilotDetails pilot={currentPilot} />
                        </Segment>
                    </Grid.Column>
                </Grid>
            </Segment>
        );
    }
}
Since our Mechs list is effectively identical so far, we'll do the same set of transformations on that as well.
Commit 6b51219: Extract components from Mechs panel, and add initial test data
There's one new and useful tidbit to show out of this commit. In Battletech, a Battlemech can weigh anywhere from 20 to 100 tons, in 5-ton increments. Mechs are frequently described and grouped based on their "weight class". Mechs from 20-35 tons are "Lights", 40-55 tons are "Mediums", 60-75 tons are "Heavies", and a Mech weighing 80-100 tons is an "Assault". This is a description that can be derived based on the known weight of a Mech type. So, we can write a small selector function that takes in a weight value, and returns a description of the weight class:
features/mechs/mechSelectors.js
const WEIGHT_CLASSES = [
    {name : "Light", weights : [20, 25, 30, 35]},
    {name : "Medium", weights : [40, 45, 50, 55]},
    {name : "Heavy", weights : [60, 65, 70, 75]},
    {name : "Assault", weights : [80, 85, 90, 95, 100]},
];

export function getWeightClass(weight) {
    const weightClass = WEIGHT_CLASSES.find(wc => wc.weights.includes(weight)) || {name : "Unknown"};
    return weightClass.name;
}
Nothing too fancy here. We define an array with one entry per weight class, and use the Array.find() method to return the first entry that matches a filter function. Our filter function uses the Array.includes() method to see if the given weight value is in the list of weights for that weight class. If we don't find a valid weight class, we provide a default result so that we can always return weightClass.name. This selector can then be used in <MechsListRow> and <MechDetails> to provide a display value for the given Mech instance.
Adding a Mock API for Sample Data 🔗︎
We're at a point where we need to start working with some data. In a bigger application or more realistic example, that would probably mean standing up a separate backend server to send back responses, or at least using some kind of "mock API" tool.
In order to keep this tutorial application as focused as possible, we're going to follow the classic advice of "Do The Simplest Thing That Could Possibly Work" / "You Ain't Gonna Need It". In this case, that means writing a file to contain our sample data, directly importing it into the source code, and writing a mock API query function that just returns that data in a promise.
We'll need a bit of UI to actually let us call that mock API function. Since we've already got our tabs bar set up, the simplest way to add some UI is to just create a new panel with a button that fetches the data, and add that as another tab. We'll label it the "Tools" panel for now. It might also make a good place to add "Import" and "Export" buttons down the road.
Commit db596954: Add a Tools panel and mock API for loading sample data
The only really interesting bits of out of here are the initial sample data, the mock API function, and our thunk action creator:
const sampleData = {
    unit : {
        name : "Black Widow Company",
        affiliation : "wd",
    },
};

export default sampleData;
import sampleData from "./sampleData";

export function fetchData() {
    return Promise.resolve(sampleData);
}
import {fetchData} from "data/mockAPI";

import {DATA_LOADED} from "./toolConstants";

export function loadUnitData() {
    return (dispatch, getState) => {
        fetchData()
            .then(data => {
                dispatch({
                    type : DATA_LOADED,
                    payload : data
                })
            });
    }
}
After adding the panel, the UI looks like this:

Feel the excitement! :)
Connecting the Unit Info Tab 🔗︎
It's time to start hooking up some of our UI to the store. We'll start with the simplest part: the Unit Info tab. First, a bit of background info - it would be helpful to know what a "unit" is.
A Battletech "unit" is a military group, which could be part of the official armed forces of one of the various "star nations" in the Battletech universe, or an independent combat group like a mercenary unit. The five Great Houses in the Battletech universe all maintain vast armies, while hundreds of mercenary units large and small try to make a living through combat. Some examples of units from the game universe include:
- Great House army units:
- 24th Dieron Regulars from the Draconis Combine
- 2nd Free Worlds Guards from the Free Worlds League
- 11th Avalon Hussars from the Federated Suns
- Mercenaries:
- Wolf's Dragoons
- 21st Centauri Lancers
- Hansen's Roughriders
For now, we're just going to track two attributes for a unit: their name, and what larger group they are affiliated with.
We'll start by creating a simple reducer that stores the "Name" and "Affiliation" values, add that to our root reducer, and connect the <UnitInfo> component to use the data:
Commit bce3a2d: Add initial unit info reducer and connection
features/unitInfo/unitInfoReducer.js
import {createReducer} from "common/utils/reducerUtils";

const initialState = {
    name : "Black Widow Company",
    affiliation : "wd",
};

export default createReducer(initialState, {
});
features/unitInfo/unitInfoSelectors.js
export const selectUnitInfo = state => state.unitInfo;
import {combineReducers} from "redux";

import tabReducer from "features/tabs/tabReducer";
import unitInfoReducer from "features/unitInfo/unitInfoReducer";

const rootReducer = combineReducers({
    unitInfo : unitInfoReducer,
    tabs : tabReducer,
});

export default rootReducer;
features/unitInfo/UnitInfo/UnitInfo.jsx
const mapState = (state) => ({
    unitInfo : selectUnitInfo(state),
});

class UnitInfo extends Component {
    render() {
        const {unitInfo} = this.props;
        const {name, affiliation} = unitInfo;

        return (
            <Segment attached="bottom">
                <Form size="large">
                    <Form.Field name="name" width={6}>
                        <label>Unit Name</label>
                        <input placeholder="Name" value={name}/>
                    </Form.Field>
                    <Form.Field name="affiliation" width={6}>
                        <label>Affiliation</label>
                        <Dropdown
                            selection
                            options={FACTIONS}
                            value={affiliation}
                        />
                    </Form.Field>
                </Form>
            </Segment>
        );
    }
}

export default connect(mapState)(UnitInfo);
(Side note: remember how I said I'm still trying to figure out my own best practices for folder structure? After that last code sample, I definitely have to admit that having the word "unitInfo" show up three times in a path is kinda silly. Oh well, I'll deal with it for now.)
Now that the <UnitInfo> component is being driven by data from the store, we can do something with that sample data from the mock API. Let's update the unit info reducer to respond to the DATA_LOADED action and see what happens:
features/unitInfo/unitInfoReducer.js
import {createReducer} from "common/utils/reducerUtils";

import {DATA_LOADED} from "features/tools/toolConstants";

const initialState = {
    name : "N/A",
    affiliation : "",
};

function dataLoaded(state, payload) {
    const {unit} = payload;

    return unit;
}

export default createReducer(initialState, {
    [DATA_LOADED] : dataLoaded,
});
The reducer's very simple for now. We start with some empty data in our initial state, listen for DATA_LOADED, and return the unit data from the action payload.
If we load the page, we should see "Name: N/A". If we then click the "Reload Unit Data" button in the Tools tab, we should see it change to "Name: Black Widow Company". No point in showing a screenshot here, because the UI should still look exactly the same as it has up until now.
Adding a Redux-ORM Schema and Model 🔗︎
Okay, so loading two fields was pretty easy. It's time to start actually working out what the application's data model will look like.
As described back in Part 0 and Part 3, the goal of this sample application is to build a miniature version of the Battletech MekHQ game tool. We want to be able to track Battlemech Pilots assigned to a combat unit, which specific Battlemech each Pilot is assigned to, and ultimately organize Battlemechs and their Pilots into groups called "Lances" and "Companies".
We're going to use the Redux-ORM library to help define what our data types are and how they relate to each other. Those Model types can then be used to help us load data into our store, and query and update that data. (See Part 1: Redux-ORM Basics and Part 2: Redux-ORM Concepts and Techniques for details on how the library works.)
The first thing we'll do is create a Redux-ORM Schema instance, and a parent reducer for all of our entity data. Since this code isn't specific to a single feature, we'll add it underneath the app folder.
Commit 1e48ca2: Create a Redux-ORM Schema and the initial entities reducer
import {Schema} from "redux-orm";

const schema = new Schema();

export default schema;
app/reducers/entitiesReducer.js
import {createReducer} from "common/utils/reducerUtils";

import schema from "app/schema"

const initialState = schema.getDefaultState();

export default createReducer(initialState, {
});
import {combineReducers} from "redux";

+import entitiesReducer from "./entitiesReducer";
import tabReducer from "features/tabs/tabReducer";
import unitInfoReducer from "features/unitInfo/unitInfoReducer";

const rootReducer = combineReducers({
+   entities : entitiesReducer,
    unitInfo : unitInfoReducer,
    tabs : tabReducer,
});
If we look at our overall app state now using the Redux DevTools, we'll see entities: {}. That's because we haven't added any Model types to the Schema instance.
The first Model type we should add is for pilots. We'll keep it really simple - just a Pilot class, with no relations, and add that to our Schema. There's no specific rule for where Model classes should be defined, so for the moment we're going to define them inside the relevant feature folders.
import {Model} from "redux-orm";

export default class Pilot extends Model {
}

Pilot.modelName = "Pilot";
import {Schema} from "redux-orm";

+import Pilot from "features/pilots/Pilot";

const schema = new Schema();
+schema.register(Pilot);

export default schema;
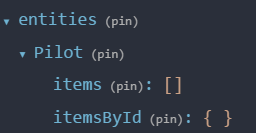
Now that we have the Pilot model class registered with the Schema instance, we can go back to the Redux DevTools and see that the generated initial state for our entities slice reducer now includes an empty "table" for the Pilot type:
Loading Pilot Data with Redux-ORM 🔗︎
With the Pilot model hooked up to the Schema, we can start using it for something useful. We already have a sample data file and a DATA_LOADED action being dispatched containing that data. Let's add some pilot entries to that list, and load them into memory.
For sample entries, we're going to use the characters from the legendary Black Widow Company of the Wolf's Dragoons mercenary unit, as they existed in the 3025 game era. This group was led by the notorious Black Widow herself, Natasha Kerensky.
We'll define several attributes for each pilot: an ID, their name, rank, age, in-game Gunnery and Piloting skills (lower is better), and a short description of what type of Battlemech they pilot. An example looks like:
{
    pilots: [
        {
            id : 1,
            name : "Natasha Kerensky",
            rank : "Captain",
            gunnery : 2,
            piloting : 2,
            age : 52,
            mechType : "WHM-6R",
        },
        {
            id : 2,
            name : "Colin Maclaren",
            rank : "Sergeant",
            gunnery : 3,
            piloting : 4,
            age : 43,
            mechType : "MAD-3R",
        },
    ]
}
Once those entries have been added to the sample data, they wil be included in the DATA_LOADED action we've been dispatching. So, we should update our entitiesReducer to respond to that action.
Redux-ORM provides methods on Model instances to query, update, and delete instances. It also provides a create static method on the class itself to create new instances. I like to write parse methods on my Model classes that encapsulate the logic for handling all the relations that might be involved in nested JSON data. Since this is our first Model type, there's actually nothing special we need to do:
Commit 04a6785: Add Pilot parsing, and load Pilots from sample data
import {Model} from "redux-orm";

export default class Pilot extends Model {
    static parse(pilotData) {
        // We could do useful stuff in here with relations,
        // but since we have no relations yet, all we need
        // to do is pass the pilot data on to create()

        // Note that in a static class method, `this` is the
        // class itself, not an instance
        return this.create(pilotData);
    }
}

Pilot.modelName = "Pilot";
app/reducers/entitiesReducer.js
export function loadData(state, payload) {
    // Create a Redux-ORM session from our entities "tables"
    const session = schema.from(state);
    // Get a reference to the correct version of the Pilots class for this Session
    const {Pilot} = session;

    const {pilots} = payload;
    // Queue up creation commands for each pilot entry
    pilots.forEach(pilot => Pilot.parse(pilot));

    // Apply the queued updates and return the updated "tables"
    return session.reduce();
}

export default createReducer(initialState, {
    [DATA_LOADED] : loadData,
});
Notice that we actually have two different slice reducers responding to the same action! Both our unitInfoReducer and our entitiesReducer are responding to the DATA_LOADED action. This is a key concept for Redux usage, which is often misunderstood or ignored. It doesn't happen by accident, or completely automatically - the combineReducers function we're using in our rootReducer is specifically calling both slice reducers, and giving them a chance to respond to that action by updating their own slice of data. We could implement the same behavior ourselves, but combineReducers does it for us. (We could also choose not to use combineReducers if we wanted to, and maybe handle things a different way if it made sense.)
If we hit the "Reload Unit Data" button in our "Tools" tab and check out the results in the DevTools, our entities slice should now contain entries for each of the pilot entries in our sample data:
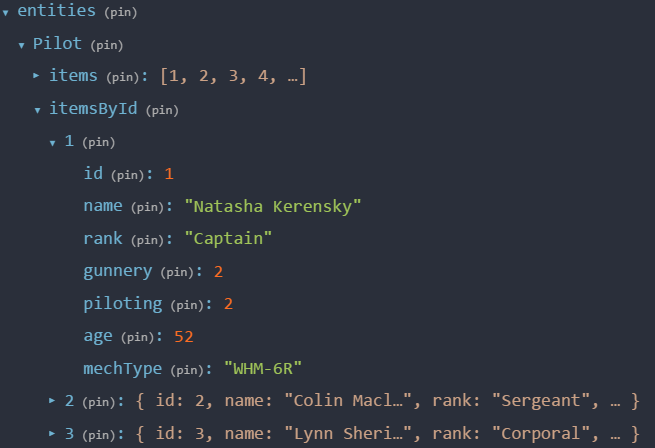
Also notice that Redux-ORM automatically stored all the pilots in "normalized" form, by creating an items array for the Pilot type that stores a list of all item IDs, and an itemsById lookup table that stores the actual objects keyed by their IDs
Displaying a List of Pilots 🔗︎
Now that we have pilots added to the store, we can update our <Pilots> and <PilotsList> components to display them. Since we already had <Pilots> acting as a container component, all we really need to do is connect it to the store, return an array of plain JS pilot objects as a prop, and switch from using the sample entry we had stored in its state to the array from props.
To do this, we're going to import the singleton Redux-ORM Schema instance we created. In our mapState function, we'll create a Session instance from the current set of "tables" in our state, and use the Pilot class we defined to query those tables. We'll retrieve a list of the actual JS objects, and return those as a prop.
Commit 5e2b5d5: Connect the Pilots component to render a list of pilots from the store
features/pilots/Pilots/Pilots.jsx
// Omit imports not relevant to this commit
import schema from "app/schema";

const mapState = (state) => {
    // Create a Redux-ORM Session from our "entities" slice, which
    // contains the "tables" for each model type
    const session = schema.from(state.entities);

    // Retrieve the model class that we need.  Each Session
    // specifically "binds" model classes to itself, so that
    // updates to model instances are applied to that session.
    // These "bound classes" are available as fields in the sesssion.
    const {Pilot} = session;

    // Query the session for all Pilot instances.
    // The QuerySet that is returned from all() can be used to
    // retrieve instances of the Pilot class, or retrieve the
    // plain JS objects that are actually in the store.
    // The toRefArray() method will give us an array of the
    // plain JS objects for each item in the QuerySet.
    const pilots = Pilot.all().toRefArray();

    // Now that we have an array of all pilot objects, return it as a prop
    return {pilots};
}

export class Pilots extends Component {
    render() {
        const {pilots = []} = this.props;

        // Use the first pilot as the "current" one for display, if available.
        const currentPilot = pilots[0] || {};

        // Omit rendering code, which didn't change
    }
}

export default connect(mapState)(Pilots);
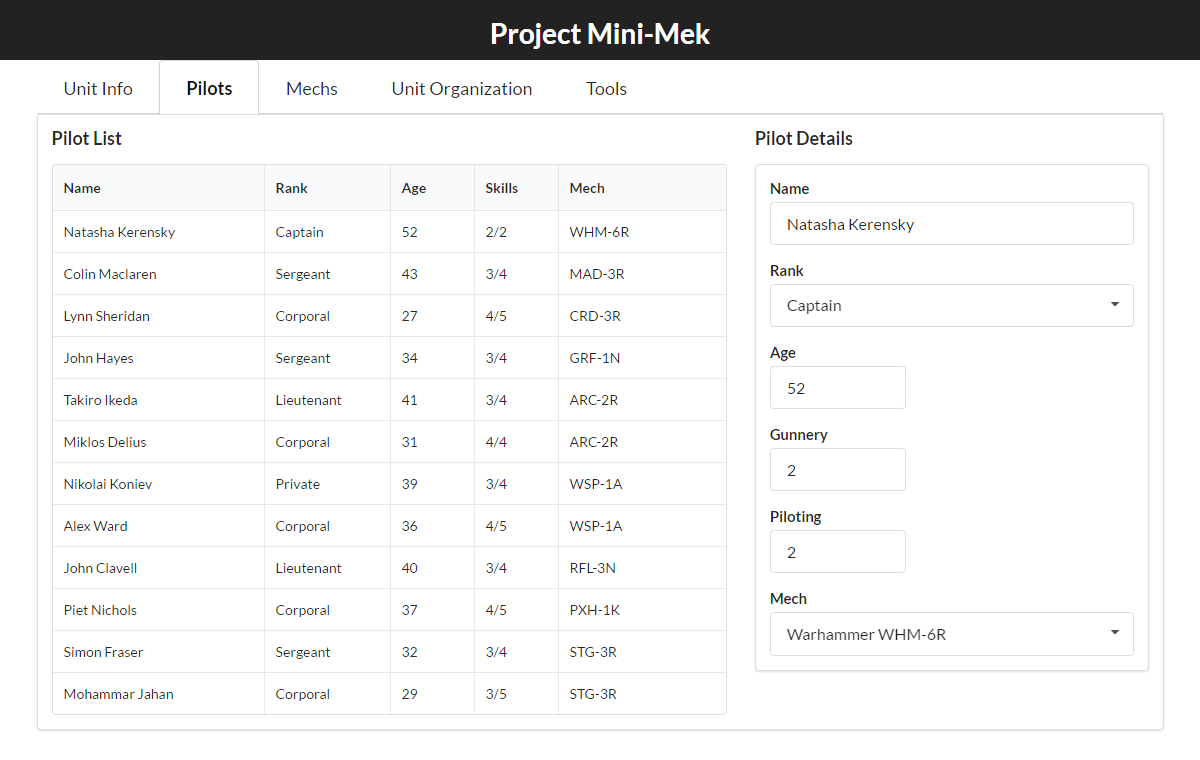
And with that, we finally have something useful and interesting displayed on screen!
Defining Models with Relations 🔗︎
Redux-ORM allows you to define relations between various model types, using standard database concepts. This is done by adding a fields entry on a Model class type itself, and using the relation operators provided by Redux-ORM. Also, as described in Part 2, when a Model instance is created Redux-ORM will generate getter properties for all fields in the actual data object, as well as all of the relational fields.
With those ideas in mind, we're almost ready to define our next couple Model types, but first we need to review a bit more information about the ideas we're trying to represent. In Battletech, there are many different Battlemech designs. Each design has different statistics: weight, speed, armor, weapons, and so on. There may also be different variations on the same design, which would share the same basic characteristics (usually weight and speed), but maybe have some differences in weapons and armor. There can be many different individual mechs of the same design. Here's some examples of different Battlemech design variants to give you the idea:
- Stinger STG-3R: 20 tons; 6/9/6 movement points (walk/run/jump); 48 armor points; 1 Medium Laser and 2 Machine Guns
- Stinger STG-3G: 20 tons; 6/9/6 movement points; 69 armor points; 2 Medium Lasers
- Warhammer WHM-6R: 70 tons; 4/6 movement points; 160 armor points; 2 PPCs, 2 Medium Lasers, 2 Small Lasers, 1 SRM-6 launcher
- Warhammer WHM-6D: 70 tons; 4/6 movement points; 217 armor points; 2 PPCs, 2 Medium Lasers, 2 Small Lasers
As a real-life comparison, the F-15 Eagle has several variants: the F-15C is made for air-to-air combat, the F-15D is a training version, the F-15E is intended for ground attacks, and hundreds of individual F-15s have been manufactured.
For our data modeling, we're going to create two more Model classes. We're going to need to store information on different Battlemech designs, and we also need to track individual mechs. Rather than copy all the attributes of a design into each individual Mech entry, we can just store the design once, and add a relation between the individual Mech and its design entry. Meanwhile, since Pilots are going to be assigned to Mechs, we would also want to be able to relate Pilots and Mechs to each other.
Based on that, we're going to create separate models for MechDesigns and Mechs. The Mech class will use "foreign key" relations to point to a MechDesign instance and a Pilot instance. For now, we'll also add an FK relation from Pilot to Mech so that we can look up the Mech instance that a given Pilot is assigned to. We'll also go ahead and create parse() methods on them so that we can load them from data. Finally, we'll add the Mech and MechDesign classes to our Schema instance, the same way we did with Pilot.
Commit f28fee9: Define Mech and MechDesign model classes, and add them to the schema
import {Model} from "redux-orm";

export default class MechDesign extends Model {
    static parse(designData) {
        return this.create(designData);
    }
}

MechDesign.modelName = "MechDesign";
import {Model, fk} from "redux-orm";


export default class Mech extends Model {
    static get fields() {
        return {
            type : fk("MechDesign"),
            pilot : fk("Pilot"),
        };
    }

    static parse(mechData) {
        return this.create(mechData);
    }
}

Mech.modelName = "Mech";
(The fields option could have been defined as Mech.fields = {...} as well, I've just been doing it this way since I started using Redux-ORM. No practical difference as far as I know.)
After making those changes, we're also going to be making several other related changes in a follow-up commit. First, we need to add entries for MechDesigns and Mechs to our sample data. Second, we need to update the existing Pilot data so that they refer to a specific individual mech's ID, rather than the ID of a mech type. Those data changes look roughly like this (for one of the entries):
Commit 3b25f24:Load Mechs and MechDesigns from sample data, and use in display
pilots : [
    {
        id : 1,
        name : "Natasha Kerensky",
        rank : "Captain",
        gunnery : 2,
        piloting : 2,
        age : 52,
-       mech : "WHM-6R",
+       mech : 1,
    },
],
+designs : [
+   {
+       id : "WHM-6R",
+       name : "Warhammer",
+       weight : 70,
+   },
+],
+mechs : [
+   {
+       id : 1,
+       type : "WHM-6R",
+       pilot : 1,
+   },
+]
Third, we need to update our entities reducer to also load the Mech and Design entries into state:
export function loadData(state, payload) {
    // Create a Redux-ORM session from our entities "tables"
    const session = schema.from(state);
    // Get a reference to the correct version of model classes for this Session
    const {Pilot, MechDesign, Mech} = session;

    const {pilots, designs, mechs} = payload;

    // Queue up creation commands for each entry
    pilots.forEach(pilot => Pilot.parse(pilot));
    designs.forEach(design => MechDesign.parse(design));
    mechs.forEach(mech => Mech.parse(mech));

    // Apply the queued updates and return the updated "tables"
    return session.reduce();
}
The final change we need to make here is how we prepare the data in the mapState function for <Pilots>. Previously, we just returned the plain JS objects directly. Now, though, we need to follow the relations from Pilot to Mech to MechDesign in order to display what type of mech this Pilot uses. The revised mapState function now looks like this:
features/pilots/Pilots/Pilots.jsx
const mapState = (state) => {
    // Create a Redux-ORM Session from our "entities" slice, which
    // contains the "tables" for each model type
    const session = schema.from(state.entities);

    // Retrieve the model class that we need.  Each Session
    // specifically "binds" model classes to itself, so that
    // updates to model instances are applied to that session.
    // These "bound classes" are available as fields in the sesssion.
    const {Pilot} = session;

    // Query the session for all Pilot instances.
    // The QuerySet that is returned from all() can be used to
    // retrieve instances of the Pilot class, or retrieve the
    // plain JS objects that are actually in the store.

    // The withModels modifier will let us map over Model instances
    // for each entry, rather than the plain JS objects.
    const pilots = Pilot.all().withModels.map(pilotModel => {
        // Access the underlying plain JS object using the "ref" field,
        // and make a shallow copy of it
        const pilot = {
            ...pilotModel.ref
        };

        // We want to look up pilotModel.mech.mechType.  Just in case the
        // relational fields are null, we'll do a couple safety checks as we go.

        // Look up the associated Mech instance using the foreign-key
        // field that we defined in the Pilot Model class
        const {mech} = pilotModel;

        // If there actually is an associated mech, include the
        // mech type's ID as a field in the data passed to the component
        if(mech && mech.type) {
            pilot.mechType = mech.type.id;
        }

        return pilot;
    });

    // Now that we have an array of all pilot objects, return it as a prop
    return {pilots};
}
With these changes in place, the <PilotsList> should render exactly the same, but with the data for the last column now coming from the MechDesign "table" instead of being directly in each pilot entry.
Displaying a List of Mechs 🔗︎
We can now connect our <Mechs> component the same way we did <Pilots>. This is pretty straightforward, and the only really interesting part is the mapState method:
Commit 7a5b756: Connect the Mechs component to display a list of mechs from the store
features/mechs/Mechs/Mechs.jsx
// Omit imports

const mapState = (state) => {
    const session = schema.from(state.entities);
    const {Mech} = session;

    const mechs = Mech.all().withModels.map(mechModel => {
        const mech = {
            // Copy the data from the plain JS object
            ...mechModel.ref,
            // Provide a default empty object for the relation
            mechType : {},
        };

        if(mechModel.type) {
            // Replace the default object with a copy of the relation's data
            mech.mechType = {...mechModel.type.ref};
        }

        return mech;
    });

    return {mechs}
}

// Omit component
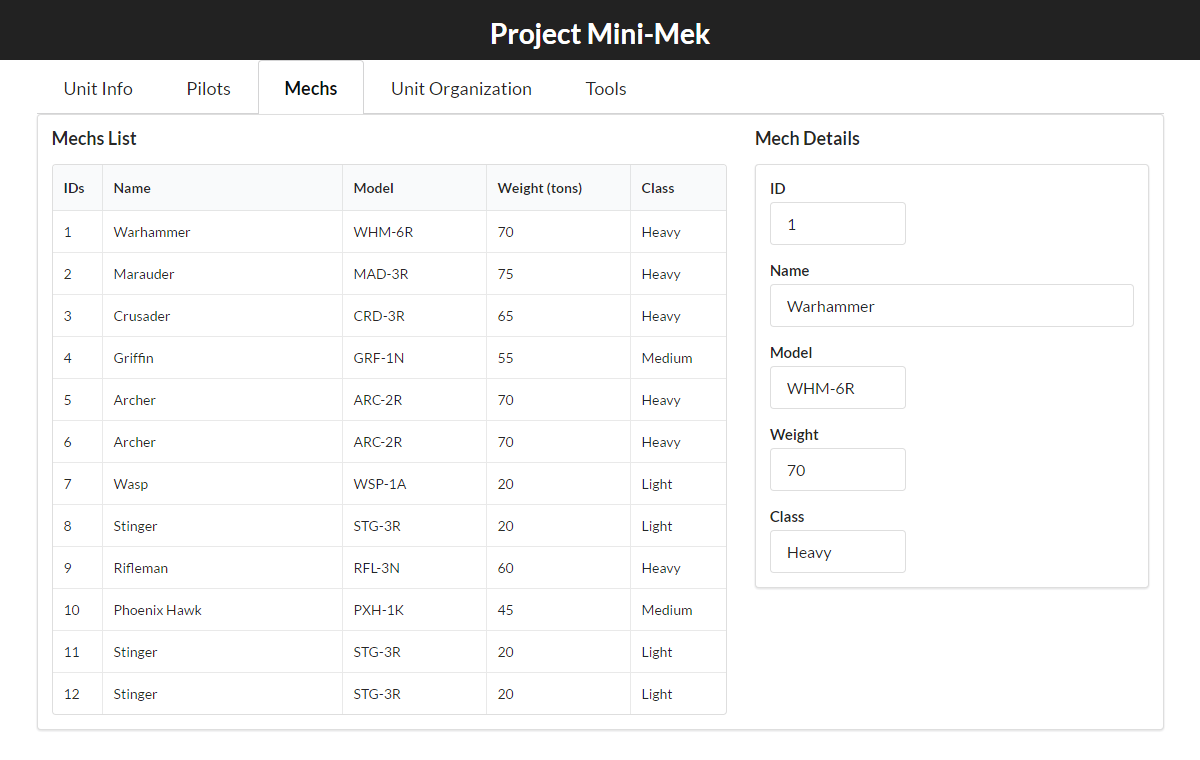
And that gives us this update to our UI:
Handling Selection Logic 🔗︎
We're almost done with this set of changes. The last thing to add for now is the ability for the user to click on either of the lists and select the item that was clicked on. Right now, we're just defaulting to using the first item in an array as the "current" item for display in the Details sections.
We'll start with the Pilots list. We don't have a reducer for anything pilot-related yet, so we'll create one. Going along with the idea of "normalization", all we need to store is the ID of the currently selected pilot. We'll actually get a bit fancy with the reducer logic, and handle de-selecting the current item entirely if the user clicks on it again:
Commit c42c5bd: Add logic for tracking the currently selected pilot
features/pilots/pilotsReducer.js
import {createReducer} from "common/utils/reducerUtils";

import {PILOT_SELECT} from "./pilotsConstants";

const initialState = {
    currentPilot : null
};

export function selectPilot(state, payload) {
    const prevSelectedPilot = state.currentPilot;
    const newSelectedPilot = payload.currentPilot;

    const isSamePilot = prevSelectedPilot === newSelectedPilot;

    return {
        // Deselect entirely if it's a second click on the same pilot,
        // otherwise go ahead and select the one that was clicked
        currentPilot : isSamePilot ? null : newSelectedPilot,
    };
}

export default createReducer(initialState, {
    [PILOT_SELECT] : selectPilot,
});
That gives us some data handling, but we need to hook that up to the UI. We need to pull the currentPilot ID value into <Pilots>, and use that in a couple places. We should pass the actual entry for the current pilot into <PilotDetails>, and it would also be nice to highlight the row for that pilot in the list. We also need to call the selectPilot action creator with the ID of the pilot whose row was just clicked on. Let's look at the relevant changes:
features/pilots/Pilots/Pilots.jsx
// Omit initial imports

+import {selectPilot} from "../pilotsActions";
+import {selectCurrentPilot} from "../pilotsSelectors";

const mapState = (state) => {}
    // Omit pilot objects lookup

+   const currentPilot = selectCurrentPilot(state);

    // Now that we have an array of all pilot objects, return it as a prop
-   return {pilots};
+   return {pilots, currentPilot};
}


+// Make an object full of action creators that can be passed to connect
+// and bound up, instead of writing a separate mapDispatch function
+const actions = {
+    selectPilot,
+};

export class Pilots extends Component {
    render() {
-       const {pilots = []} = this.props;
+       const {pilots = [], selectPilot, currentPilot} = this.props;

-       const currentPilot = pilots[0] || {};
+       const currentPilotEntry = pilots.find(pilot => pilot.id === currentPilot) || {}

        // Omit irrelevant layout component rendering for space
        return (
            <Segment>
-               <PilotsList pilots={pilots} />
+               <PilotsList
+                   pilots={pilots}
+                   onPilotClicked={selectPilot}
+                   currentPilot={currentPilot}
+               />
-               <PilotDetails pilot={currentPilot} />
+               <PilotDetails pilot={currentPilotEntry} />
            </Segment>
        );
    }
}

-export default connect(mapState)(Pilots);
+export default connect(mapState, actions)(Pilots);
features/pilots/PilotsList/PilotsList.jsx
export default class PilotsList extends Component {
    render() {
-       const {pilots} = this.props;
+       const {pilots, onPilotClicked, currentPilot} = this.props;

        const pilotRows = pilots.map(pilot => (
-           <PilotsListRow pilot={pilot} key={pilot.name}/>
+           <PilotsListRow
+               pilot={pilot}
+               key={pilot.name}
+               onPilotClicked={onPilotClicked}
+               selected={pilot.id === currentPilot}
+           />
        ));

        // Omit layout rendering for space
    }
features/pilots/PilotsList/PilotsListRow.jsx
+import _ from "lodash";

-const PilotsListRow = ({pilot={}}) => {
+const PilotsListRow = ({pilot={}, onPilotClicked=_.noop, selected}) => {
    const {
+        id = null,
        // Omit other fields
    } = pilot;

    return (
-       <Table.Row>
+       <Table.Row onClick={() => onPilotClicked(id)} active={selected}>
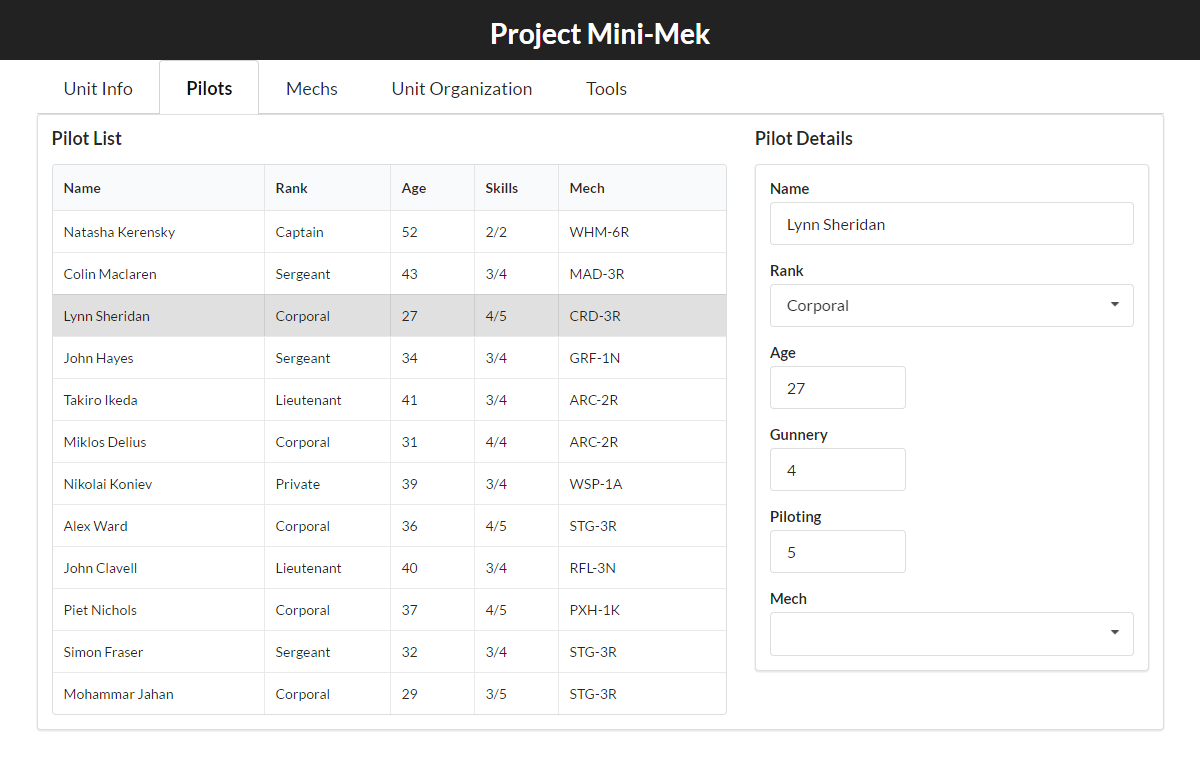
And voila! If we click on an entry in the pilots list, we should now see that row highlighted, and the entry also shown in the <PilotDetails> form:
And finally, after WAYYYY too long of a blog post, the last thing we'll do is implement the same behavior for the mechs list as well:
Commit 54794ac: Add logic for tracking the currently selected mech
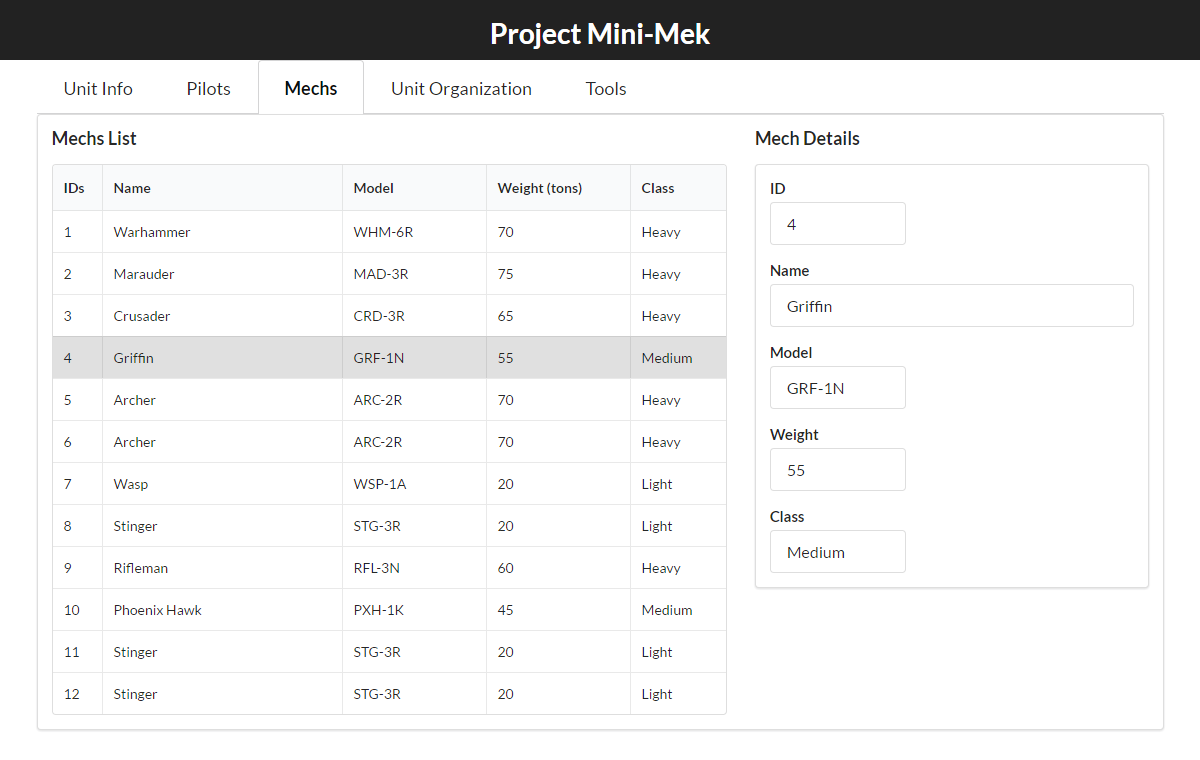
And we see the same nicely highlighted selection for the mechs list:
Final Thoughts 🔗︎
For those of you who actually got this far, congratulations! That was a lot of words, code, screenshots, and links. But, Project Mini-Mek is now starting to look vaguely useful. We've got some realistic-looking data being loaded up, our first data models are defined, we're displaying that data in the UI, and we can actually interact with the lists a bit. It's taken some time to get here, but we've laid a pretty good foundation for the application. After this, we should be able to start implementing some interesting and useful features with specific techniques.
Be sure to tune in next time, when we might just finally get around to doing some of that form editing work I've been promising for the last couple posts! :)
Further Information 🔗︎
- Project Mini-Mek repo
- Sourcemaps
- Create-React-App and Sourcemaps
- Normalization
This is a post in the Practical Redux series. Other posts in this series:
- Jan 01, 2018 - Practical Redux, Part 11: Nested Data and Trees
- Nov 28, 2017 - Practical Redux course now available on Educative.io!
- Jul 25, 2017 - Practical Redux, Part 10: Managing Modals and Context Menus
- Jul 11, 2017 - Practical Redux, Part 9: Upgrading Redux-ORM and Updating Dependencies
- Jan 26, 2017 - Practical Redux, Part 8: Form Draft Data Management
- Jan 12, 2017 - Practical Redux, Part 7: Form Change Handling, Data Editing, and Feature Reducers
- Jan 10, 2017 - Practical Redux, Part 6: Connected Lists, Forms, and Performance
- Dec 12, 2016 - Practical Redux, Part 5: Loading and Displaying Data
- Nov 22, 2016 - Practical Redux, Part 4: UI Layout and Project Structure
- Nov 10, 2016 - Practical Redux, Part 3: Project Planning and Setup
- Oct 31, 2016 - Practical Redux, Part 2: Redux-ORM Concepts and Techniques
- Oct 31, 2016 - Practical Redux, Part 1: Redux-ORM Basics
- Oct 31, 2016 - Practical Redux, Part 0: Introduction